Friday, January 21, 2011

SharePoint 2007 Approval Workflow US Date format in Emails

I am using SharePoint 2007 with SP2 in a 64bit environment. The SharePoint Server regional settings are set to English (UK) and the SharePoint site I am using is also set English UK settings. I am also using the out-of-the-box approval workflow so you would expect that any dates are shown in UK format both in the workflow history and in emails sent by the workflow.

Wrong. They display in US format (MM/dd/yyyy).

Now when I Googled this I found this site which suggested it is fixed in the October 2008 Cumulative update. Indeed the Microsoft support page explicitly states as fixed "Sharepoint workflow notification e-mail messages do not use locale date and time formats".

Wrong again.
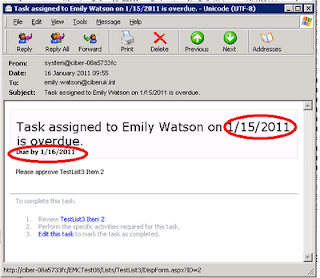
Maybe it was fixed back in October 2008 (pre SP2) but I can tell you it's not working post SP2. I raised a support call with Microsoft and proved that the dates are indeed in US format when they shouldn't be.

You require the August 2010 Cumulative Update from Microsoft to be applied to get this to work. Once the hotfix is applied then it all works prefectly with the due date correctly appearing in UK format both in the workflow history and in the emails. This even works on workflows that are in flight before you applied the hotfix.

While I am glad to have a solution, Microsoft should be ashamed that something as basic as this has had to be fixed twice. Zero points, Microsoft!

Saturday, January 15, 2011

BizTalk Server Evaluation Version Upgrade to Full Version

One of my customers had installed an evaulation version of BizTalk Server 2009 for their test environment, and sure enough the version expired and BizTalk stopped working.
So they needed me to upgrade it to the full version (in this case we used the Developer Edition but the same process is used for upgrading to Standard or Enterprise Editions).
But when I started the Install process it immediatley gave the message that you can't upgrade the evaluation version and you must uninstall and reinstall.
At first sight this looks disastrous but infact you can recover everything because unsinstall does not delete the Biztalk databases. But there are a number of steps you should take before uninstalling BizTalk.

1. Export the applications to MSI files and Export the Bindings just in case it all goes horribly wrong.

2. Make a screen shot of the host instances in BizTalk Administration because these will be deleted and you will need to recreate them.

3. The host instances use service accounts and you'll need the passwords for these accounts.

4. Ensure that the account you are going to use to install BizTalk is the same one you used for the Evaluation version. If like me you don't know, use an account who is a local administrator and is sysadmin on the SQL Server box where the databases are installed (dbowner of all the BizTalk databases may be enough).

5. Make sure you have a copy of the BTSNTSVC.exe.config file as this may contain configuration settings.

6. Have a backup of the Enterprise Single Sign-On secret - and you must know what the password is (ideally the password hint will help). This is vital. If you don't have the password for the backup you will be hosed. I don't know if you are able to do the backup once the evalaution has expired. If you can open a command window and navigate to c:\Program Files\Common Files\Enterprise Single Sign-On. Then use
ssoconfig –backupSecret backupfilename

OK, now you can uninstall the evaluation version and install the full version. Next you need to run the BizTalk Configuration wizard. Be sure to select Custom configuration and enter the database server name and the account credentials for services.
The Enterprise SSO option is currently configured so select Join an existing SSO system. You will get a warning symbol indicating you may need to restore the SSO master secret (you will definitely need to).
On the Group otion select Join an existing BizTalk Group. On the BizTalk Server RunTime do not Create In-Process Host and Instance because In-Process Host is still present. Liekwise do not create Isolated Host and Instance.
Configure the other options appropriately and Apply the Configuration.
If all goes well the Configuration will complete successfully. But you are not done.

7. First open a command window and navigate to c:\Program Files\Common Files\Enterprise Single Sign-On. Then use
ssoconfig –restoreSecret backupfilename
It will prompt you for the password showing you the password hint. This is why point 6 was so important if you don't have a backup or you don't know the password you are stuffed.

8.Open BizTalk Administration go to the Host Instances and add the ones that were originally there (which is why we did point 2 above). Use the same accounts and passwords and start them up.

9. Edit the BTSNTSvc.exe.config file and add any custom entries that you saved from point 5. Stop and restart the BizTalk Service(s).

That should be it, you should be up and running again. Its a pity Microsoft don't offer a better upgrade path than this.  If the full version is available on MSDN my advice is avoid using the evaluation copy.

Wednesday, October 6, 2010

InfoPath 2007 and Forms Services - Deployment Part 2

Forgive me reader, it has been a while since my last post.

I have a project that involved deploying three InfoPath browser-enabled forms made available on a SharePoint 2007 site. The site is an extranet site, accessed over the Internet by users who use an AD account and password to login.

The infrastruture uses ForeFront Threat Management Gateway (the successor to ISA server). Now TMG is a bit of a God-send for developers because it handles SSL for you. TMG hold the Server Certificate and takes all inbound https requests and maps them to http requests on port 80. Very neat, because it means that I can focus on developing the SharePoint site and not worry about SSL. Not quite.

I ran into some issues with the InfoPath forms. They worked absolutely fine when called internally: reading data from a web service upon load and then submitting to a web service on Submit. When I called the same forms when accessing the site externally, then I got several problems.

1. I could not load the forms at all initially.

2. When the form did load, the company logo would not display. IE gave me a warning message about unsecure content on the page and I could not disable it even by allowing Mixed Content in IE options.

3. The third error came when I tried to submit. "The form cannot be submitted to the Web server either because your computer is offline or because the host server is currently unavailable".

4. When the form closed, I got an error whereas it should have redirected back to the calling page. Again it was working fine internally.

The first problem is due to the supposed complexity of the url used to call the form (its the passed parameters). This is TMG rejecting the url. It is solved by modifying the HTTP policy on the Firewall rule to uncheck the options "Blocking high bit characters " and "Verify Normalization".

The second problem is fixed by the same solution as the third problem. If you take a look at the source code there is a variable g_objCurrentFormData that holds the content for the form. Buried in there you will find the url for the location of the xsn and its "Source" (the url it will return to) but InfoPath replaces the http:// with http:\u002f\u002f. Isn't that obscure? The issue is that it is using http and not https so you need to create a Link Translation on the Firewall policy that maps http:\u002f\u002fcontoso.com with https:\u002f\u002fcontoso.com. When that is done it, the form submitted successfully and also displayed the company logo without any warning messages from IE.

The fourth problem is due to the url for calling the form. It includes an &Source= parameter that is the return url for the form. But it uses the http url and that won't work externally. Trying to change it to be https also gave an error. So in the end I simply removed it, and the form still managed to return to the originating url. By the way, to force the form in the browser append &OpenIn=Browser.

So in the end I didn't have to make any changes to my form to make it work externally, it was all down to settings in TMG.

Go in peace - and say twenty Hail Mary's.

Sunday, July 18, 2010

Writing to MSMQ

I was recently trying to write a message to MSMQ on a remote server. I knew there were two steps but I didn't realize there was a third.

1. Modify the Queue name to the correct format
2. On the MSMQ queue give write access to the account you are running under
3. Install MSMQ on the source server

MSMQ name
The MSMQ format name is a particular structure you need to get right - including the case:
FormatName:DIRECT=OS:<servername>\private$\<queuename>

Write Access
If your code was running as a web service as mine was, then the App Pool identity must be a domain account and that account needs to have write access to the MSMQ on the target server.

Install MSMQ locally
I hadn't relaized this. You must install MSMQ in the local server where the code is running. The reason is that it logs messages in an Outbound Queue. This is what you would need if you were running in an off-line situation and then wanted the messages forwarded when you were on-line. I did not relaize that it would also do this even with a permanently connected enviroment. So install MSMQ locally and life will be good.

InfoPath 2007 and Forms Services - Deployment

I've always hated deploying InfpPath forms to a Production environment because I couldn't figure out how to change the path of any data connections without modifying the data connections with the appropriate url which means installing InfoPath in a Production environment.

I recently found that with an InfoPath form with managed code you can modify the manifest.xsf manually in NotePad and modify any urls. Publishing the form from VS will then create an XSN with the correct urls. This avoids using the data connection wizrd which will try to access the url.
Now I already new that you can convert the data connections into a UDCX file and then store that in a local data connections library but the path to the data connections library was still hard coded in the XSN with the server name. So if you deploy to production the InfoPath form is looking for the data connection library you used in development. It seemed like a ridiculous situation.

But finally I stumbled on this post which explains what to do. The post deploys the InfoPath form as a feature and uses WSP builder to bundle it as a solution.

The trick is to select "centrally managed data connection library (advanced)" when you modify the data connections. Copy the UDCX out of the data connection library that you used, modify it as desribed in the post. Then upload it in Central Administration -> Application Management -> Manage data connection files. Then deploy your InfoPath forms. Note that if you have managed code, the DLL not only has to be in the GAC but it also needs to be in the Feature folder .

I have to confess that we had major problems trying to create a feature for the InfoPath forms. It kept saying the form was not browser enabled which it clearly was. In the end because we only had 3 forms we gave up and installed it manually. Low and behold it worked in the browser perfectly. I should add that the forms are really quick to load, so much better than using the InfoPath client.

Thursday, May 13, 2010

InfoPath 2007 and Forms Services

I struggle to remember how to deploy an InfoPath 2007 form to SharePoint when it is a browser version. So here's the deal.

Create the InfoPath form and make sure the compatibility is set for browser version and that you make the form Fully Trusted and sign it with a digital certificate.

Now publish to form to a network location - its a temporary location and you can make it a local directory if you want. But when prompted to provide an alternate name for the form, leave this blank.


Now go to Central Administration and Application Centre and then select Upload Form template under InfoPath Form Services.

On the screen click Browse and navigate to where you uploaded the InfoPath template to. Click Verify and check for errors, if OK, then use Upload to upload the form template.

Go to Manage Form Templates and wait for the form to be installed and then right click and activate it to a site collection. What happens is the form is copied to the Form Template document library of the site collection (use View Site Content on the site collection in question to see the Form Templates library). It also adds the for as a site content type.

So now go to the top site of the site collection, choose Site Actions and Site Content Types. Scroll down the screen until you see the Content Type under Form Content types.

If you go to a Form Library and set it for supporting content types, you will be able to add en existing content type and then add the new form template.

If you go back to the Form Library and select New you should see the new Form type under the list. That will open the form template in the browser window.

So how is this different when the form has managed "code behind"? Answer: it's the same. In the case of an InfoPath form with managed code, you would create a Visual Studio project as an InfoPath form template and use your XSN as the source form. You will need to have installed the Office 2007 Visual Studio templates. Click on the Manifest.XSF to Open the form. The FormCode.cs has the code behind. From the Project menu you will be able to Build and then Publish the form. The same wizard is displayed and you would publish to a local directory leaving the laternate name of the form blank. The DLL that is created with the form is embedded in the XSN. Upload the form template in the same way.

Tuesday, May 11, 2010

Converting XML to PDF

I was looking for an application that would convert an XML file into a PDF document. In fact I was trying to create an invoice as a PDF file were the invoice had originated from Great Plains (an application from the Microsoft Dynamics suite that claims to be an accounts package).

A colleague recommended Aspose.Words for .NET to me as he was using it for another project. It uses a Word document as a template and sets it up as a mailmerge. Now this made me a bit wary. I've had first hand expereince of programming a Word mailmerge and it wasn't a pleasant outcome. So the thought of doing a mailmerge in Word wasn't appealing. But it turns out that Aspose.Words for .Net has a single line API call that does the mailmerge for you. Brilliant!

doc.MailMerge.ExecuteWithRegions(GetTestOrderTotals());

But the second problem is a failing in Word 2007 - it doesn't support mailmerge with XML documents as a datasource. So I started looking at the examples that ship with Aspose.Words and stumbled on a Sales Invoice demo. In this case the Word document was using the NorthWinds Access database as the mailmerge source. In fact it was using 3 different views for the order header, the order line items and the order totals.

So how was I going to make that work with my XML source? A few minutes Googling gave me the answer. Word is simply using DataTables as the datasource so all I had to do was create a new DataTable with the same name as the one the Word document expected and create the appropriate columns with the correct data types. Then create a new row in the datatable and pass in the values extracted from the XML document. Bingo.

string Total = GetFieldFromXml(xmldoc, "eConnect/SOPTransactionType/taSopHdrIvcInsert/DOCAMNT");
// other strings declared and assigned here
ds.Tables.Add("OrderTotals");
ds.Tables[0].Columns.Add("OrderID");
ds.Tables[0].Columns.Add("Subtotal");
ds.Tables[0].Columns.Add("Freight");
ds.Tables[0].Columns.Add("Total");
ds.Tables[0].Rows.Add(OrderID, Subtotal, Freight, Total);

The order line items was easy to solve - I just created a DataRow for each node within my list of line items in the XML message.

What about creating the PDF document? Easy, just one line of code in Aspose.Words to specify that a PDF version is required and to open in the Web browser. I just did the usual trick of specifying the Response.ContentHeader to be application/pdf.

HttpResponse resp = Context.Response;
System.Text.Encoding enc = System.Text.Encoding.GetEncoding("ISO-8859-1");
resp.ContentEncoding = enc;
resp.ContentType = "application/pdf";
// now display PDF in browser
doc.Save("Aspose.Words.Demos.pdf", SaveFormat.Pdf, SaveType.OpenInBrowser, resp);

I was amazed how simple it was to create a PDF invoice. The great benefit of Aspose.Words is the use of the Word document as a template. It's a snip to modify the layout to get what you want. If you want to add extra fields you'll need to modify the views in Access to produce extra columns. No problem for me because I'm an old hand at Access but if you are unfamiliar with it then you might want to reconsider this option. But this is a great solution for my needs. Watch out though there is license cost to pay!