This post is the first of three on how to programmatically create SharePoint 2010 Document Folders in CRM 2011 so that documents can be uploaded.
Part 2
Part 3
There is quite a lot of code for this solution which is why I've broken it up into 3 parts. This first part outlines the scenario and the assumptions.
So here is the scenario. I have CRM 2011 and I want to store documents related to the Contact entity in SharePoint 2010. In my development environment I have both of these on the same virtual image but I've designed the code to work as a web service so it can sit it anywhere.
What CRM 2011 does is create a document library for each Entity that is enabled for document storage, and then creates a folder for each record. This example focuses on the Contact entity but it can be easily applied to other entities. When a new entity record is created in CRM 2011 and the Document menu item is clicked, it will create a) a SharePointDocumentLocation record in CRM that has the path to the SharePoint folder and b) warns you that it is about to create a document folder. The name of the folder for a Contact if based on full name. So what happens if you have two John Smiths? If the first already has created a document folder it detects that and prompts with 'the folder already exists do you want to use it?' If not, then you can modify the name of the folder to ensure it is unique.
This is an imprtant point. Assume you have a contact called Robin Wright. When you create a document folder it will be called 'Robin Wright'. When Robin gets married and changes her name to 'Robin Wrigth-Penn' then the document folder name remains the same name. CRM 2011 uses the SharePoint document location record to point to the orginal folder name. So you need to be careful, you can't assume that the full name in CRM is the same as the document folder name.
For this example I am going to assume you have the Guid for the Contact in question. This unique identifier will be used to determine if there is already a SharePoint Document Location created for this record. If so, it returns the url for you. If not, it will create the SharePoint Document Location in CRM and then create the actual folder in SharePoint based on the full name and finally returns the url to the folder.
So this code either uses the existing SharePoint Document Location or will create a new one for you and create the folder in SharePoint.
I have made another assumption. I assume you have created the SharePoint site already with the document library for the entity "Contact". It will help if you have a few SharePoint document locations already created because then you will be able to see how the database field 'ParentSiteorLocation' is populated in the SharePointDocumentLocationBase table. You need to use the 'root' Guid for the Contact document library and it should be obvious what this is if you have a few records in the table.
You can recognise this row in the table as the relativeurl reads 'contact' and the RegardingObjectID is null. The Guid you need is the SharePointDocumentLocationId from this record. It will become clearer (I hope) when you see the code.
There is another issue you will need to be aware of. Folder names in SharePoint will not allow certain characters. If they exist in your CRM Contact record e.g. the first name reads 'John & Jane' then CRM replaces the & with -. I have not checked all illegal characters are substituted with hyphen but it is my working assumption. So be warned, you will need to modify full name of contact to replace illegal characters. Also please note this code does NOT handle duplicate names - you will need to check for a duplicate and create a unique folder name.
So the next blog has the CRM code for using an existing SharePoint Document Location or create a new location. There is a reference in the code to a function that will create the actual SharePoint folder but the code for that is in the last blog.
Saturday, February 19, 2011

Friday, February 11, 2011
BizTalk Receive Location Error - Verify the schema deployed properly.
I was getting an error with Biztalk Server when receiving a file from MSMQ although you get a similar error on FILE receive locations. The message was
There was a failure executing the receive pipeline: "Microsoft.BizTalk.DefaultPipelines.XMLReceive, Microsoft.BizTalk.DefaultPipelines, Version=3.0.1.0, Culture=neutral, PublicKeyToken=31bf3856ad364e35" Source: "XML disassembler" Receive Port: "Portname" URI: "FORMATNAME:DIRECT=OS:.\PRIVATE$\QNAME" Reason: Finding the document specification by message type "RootNode" failed. Verify the schema deployed properly.
It is caused because the message does not conform to a schema that Biztalk recognises, in my case because the RootNode is not recognised. The problem is BizTalk has not saved the original message. It's gone. The method described here shows how to keep a copy of the original file. There maybe other solutions but this works well for me.
The solution I outline is for FILE ports but once you understand the principle you will see how to apply it for MSMQ. The principle is to use a Receive Location and a Send Port Group configured for the Pass Through pipeline.
The Receive Location becomes the new port which polls for inbound messages that arrive in the directory c:\inbound. The Receive Location is bound to a Recieve Port which I'll call ReceivePort1.
The Send Port Group has 2 Send Ports in it. Both Send Ports, for the sake of simplicity, are FILE ports that are configured to write out the file using %SourceFileName% to the following directories c:\filecopy and c:\biztalkinbound. Both are configured to use the Pass Through pipeline.
Got to the Filter on the Send Port Group and add the following filter
BTS.ReceivePortName == ReceivePort1
Enable the Receive Location and start both Send Ports and the Send Port Group. If you drop a file into c:\inbound it will appear in both directories c:\filecopy and c:\biztalkinbound and it will retain the original file name.
Your original Receive Location should now point to the location c:\biztalkinbound and it will be configured for whatever pipeline you were using (XML Receive or a custom Flat File pipeline).
The benefit of this is you always have a copy of the original file in its original format in the directory c:\filecopy. As an added treat I got my orchestration to delete files that were successfully processed from this directory. So c:\filecopy became the place which stored files that failed to be processed - the classic being that they failed to match the correct schema as described by the error at the beginning of the post. Send an email alert to the Sysem Administrator and you'll be a hero.
There was a failure executing the receive pipeline: "Microsoft.BizTalk.DefaultPipelines.XMLReceive, Microsoft.BizTalk.DefaultPipelines, Version=3.0.1.0, Culture=neutral, PublicKeyToken=31bf3856ad364e35" Source: "XML disassembler" Receive Port: "Portname" URI: "FORMATNAME:DIRECT=OS:.\PRIVATE$\QNAME" Reason: Finding the document specification by message type "RootNode" failed. Verify the schema deployed properly.
It is caused because the message does not conform to a schema that Biztalk recognises, in my case because the RootNode is not recognised. The problem is BizTalk has not saved the original message. It's gone. The method described here shows how to keep a copy of the original file. There maybe other solutions but this works well for me.
The solution I outline is for FILE ports but once you understand the principle you will see how to apply it for MSMQ. The principle is to use a Receive Location and a Send Port Group configured for the Pass Through pipeline.
The Receive Location becomes the new port which polls for inbound messages that arrive in the directory c:\inbound. The Receive Location is bound to a Recieve Port which I'll call ReceivePort1.
The Send Port Group has 2 Send Ports in it. Both Send Ports, for the sake of simplicity, are FILE ports that are configured to write out the file using %SourceFileName% to the following directories c:\filecopy and c:\biztalkinbound. Both are configured to use the Pass Through pipeline.
Got to the Filter on the Send Port Group and add the following filter
BTS.ReceivePortName == ReceivePort1
Enable the Receive Location and start both Send Ports and the Send Port Group. If you drop a file into c:\inbound it will appear in both directories c:\filecopy and c:\biztalkinbound and it will retain the original file name.
Your original Receive Location should now point to the location c:\biztalkinbound and it will be configured for whatever pipeline you were using (XML Receive or a custom Flat File pipeline).
The benefit of this is you always have a copy of the original file in its original format in the directory c:\filecopy. As an added treat I got my orchestration to delete files that were successfully processed from this directory. So c:\filecopy became the place which stored files that failed to be processed - the classic being that they failed to match the correct schema as described by the error at the beginning of the post. Send an email alert to the Sysem Administrator and you'll be a hero.
Access Denied message when dropping a file into the GAC (or it doesn't work)
I was using Windows Server 2008 R2 and trying to add a file to the GAC. As you know the easiest way to do this is to drag and drop the file from one window into a window with the location C:\windows\assembly.
I kept getting the Access Denied error message. I tried running the command prompt as the Administrator, navigating to C:\Windows\assembly and then typing "Start . " to open an explorer window as the Administrator. Repeated the file drop but got Access Denied again. At the time this was a .NET 3.5 assembly. Now with .NET 4.0 the location of the GAC is no longer C:\Windows\assembly but C:\Windows\Microsoft.Net\assembly and drag and drop is disabled.
OK, so the other way to install it is to use GACUTIL but guess what, its not installed on the production server. And no you can't use an old version of GACUTIL from .Net Framework 1.1, it has to be the .NET version that your DLL is using. Google said it was in the Microsoft SDK for Windows but I didn't have time to download it.
I managed to copy it from a Hyper-V image I had which had Visual Studio 2010 installed. The file for .Net v3.5 is located in C:\Program Files (x86) \Microsoft SDKs\Windows\v7.0A\bin. You just need to copy GACUTIL.EXE and GACUTIL.EXE.CONFIG.
For .Net 4.0 the location is C:\Program Files (x86)\Microsoft SDKs\Windows\v7.0A\Bin\NETFX 4.0 Tools and you need a third file 1033\gacutlrc.dll for gacutil to work. When you copy this to the production server all 3 files can be in the same directory.
The syntax is
gacutil /i myassemblyname.dll /f
To check the file is in the GAC use
gacutil /l myassemblyname (don't add the .dll)
Hope this gets you out of the same hole I was in.
I kept getting the Access Denied error message. I tried running the command prompt as the Administrator, navigating to C:\Windows\assembly and then typing "Start . " to open an explorer window as the Administrator. Repeated the file drop but got Access Denied again. At the time this was a .NET 3.5 assembly. Now with .NET 4.0 the location of the GAC is no longer C:\Windows\assembly but C:\Windows\Microsoft.Net\assembly and drag and drop is disabled.
OK, so the other way to install it is to use GACUTIL but guess what, its not installed on the production server. And no you can't use an old version of GACUTIL from .Net Framework 1.1, it has to be the .NET version that your DLL is using. Google said it was in the Microsoft SDK for Windows but I didn't have time to download it.
I managed to copy it from a Hyper-V image I had which had Visual Studio 2010 installed. The file for .Net v3.5 is located in C:\Program Files (x86) \Microsoft SDKs\Windows\v7.0A\bin. You just need to copy GACUTIL.EXE and GACUTIL.EXE.CONFIG.
For .Net 4.0 the location is C:\Program Files (x86)\Microsoft SDKs\Windows\v7.0A\Bin\NETFX 4.0 Tools and you need a third file 1033\gacutlrc.dll for gacutil to work. When you copy this to the production server all 3 files can be in the same directory.
The syntax is
gacutil /i myassemblyname.dll /f
To check the file is in the GAC use
gacutil /l myassemblyname (don't add the .dll)
Hope this gets you out of the same hole I was in.
Biztalk Server 2010 Receive Location won't Enable
I configured my Receive Location on Biztalk Server 2010 but when I tried to enable it, it remained stubbornly disabled. No error message, it just won't Enable.
In my case it was a FILE receive port and what I had forgotten to do was to make sure the service account the Biztalk Application Host is running under has FULL permissions on the file location.
Remember "Read" is not enough because BizTalk insists on deleting the inbound file. That was it. Simples!
In my case it was a FILE receive port and what I had forgotten to do was to make sure the service account the Biztalk Application Host is running under has FULL permissions on the file location.
Remember "Read" is not enough because BizTalk insists on deleting the inbound file. That was it. Simples!
BizTalk Server 2010 ConfigurationFailure
I had a failure configuring BizTalk Server 2010. The Enterprise Single Sign-On installed but I got an error with the Group and the BizTalk RunTime. When I tried to run the installation again it showed and error beside the BizTalk Managment database which stated that it had been installed and I needed to choose another database name.
This told me that the account I was using to inst all BizTalk did have the correct permissions to create databases. The error was because MSDTC was not configured correctly. This needs to be done on BOTH the BizTalk Server and the SQL Server. The correct settings are shown below.
First though, delete the Biztalk Management database from the SQL Server because you don't want to end up with two. To configure MSDTC on Windows Server 2008 R2 go to Server Manager, select Roles -> Application Server -> Component Services. Select Distributed Transaction Coordinator and then Local DTC. Right click, select Properties then click on the Security tab. Make sure you are using the Network Service account as well as checking the boxes shown.
Remember you have to do this on both the SQL Server box and the Biztalk Server.
After I had configured MSDTC I re-ran the Biztalk Server Configuration tool and the configuration completed successfully. Happy Days!
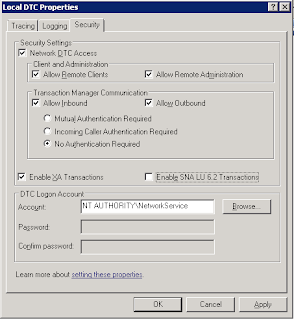
This told me that the account I was using to inst all BizTalk did have the correct permissions to create databases. The error was because MSDTC was not configured correctly. This needs to be done on BOTH the BizTalk Server and the SQL Server. The correct settings are shown below.
First though, delete the Biztalk Management database from the SQL Server because you don't want to end up with two. To configure MSDTC on Windows Server 2008 R2 go to Server Manager, select Roles -> Application Server -> Component Services. Select Distributed Transaction Coordinator and then Local DTC. Right click, select Properties then click on the Security tab. Make sure you are using the Network Service account as well as checking the boxes shown.
Remember you have to do this on both the SQL Server box and the Biztalk Server.
After I had configured MSDTC I re-ran the Biztalk Server Configuration tool and the configuration completed successfully. Happy Days!
Friday, January 21, 2011
Hiding Menu Items on a SharePoint List form
This might be a bit basic but I thought I would give a step by step guide on how to customise a SharePoint list form. The first step is you need a web control.
In your Visual Studio project you need a TEMPLATES folder and a CONTROLTEMPLATES folder beneath it. This is where you add your user control. Lets not worry too much about the code on the user control just yet.
Next we want to make the web control available when the SharePoint list form loads.
To do this add the line
<%@ Register TagPrefic="xyz" TagName="MyWebControl" src="~/_controltemplates/WebControl.ascx" %>
into the web page.
Now there are two ways to do this depending on what you want to achieve.
Firstly you can add the line into the master page so that is available to every page on the site.
Secondly you can add it to the custom page associated to the list.
In either event, the result is that the code on the web control is executed when your page loads. Since your web control is injected into the HTML of the page you can do all kindes of things from adding inline css styles that can be applied to the page or by injecting javascript onto the page to hide a menu or menu item.
One approach is to add an asp:panel onto the ASCX and embed your css styles between the start and end tags of the panel. You can also embed javascript to change the way the page is displayed.
Your code behind can then determine when to make the panel visible or hidden which will determine if the styles are applied to the page or not.
If you need to have more control over the javascript go to the code behind and use the RegisterClientScript() method or add a literal control and set the text property to the javascript function. When the literal control is rendered, the javascript is executed.
In your Visual Studio project you need a TEMPLATES folder and a CONTROLTEMPLATES folder beneath it. This is where you add your user control. Lets not worry too much about the code on the user control just yet.
Next we want to make the web control available when the SharePoint list form loads.
To do this add the line
<%@ Register TagPrefic="xyz" TagName="MyWebControl" src="~/_controltemplates/WebControl.ascx" %>
into the web page.
Now there are two ways to do this depending on what you want to achieve.
Firstly you can add the line into the master page so that is available to every page on the site.
Secondly you can add it to the custom page associated to the list.
In either event, the result is that the code on the web control is executed when your page loads. Since your web control is injected into the HTML of the page you can do all kindes of things from adding inline css styles that can be applied to the page or by injecting javascript onto the page to hide a menu or menu item.
One approach is to add an asp:panel onto the ASCX and embed your css styles between the start and end tags of the panel. You can also embed javascript to change the way the page is displayed.
Your code behind can then determine when to make the panel visible or hidden which will determine if the styles are applied to the page or not.
If you need to have more control over the javascript go to the code behind and use the RegisterClientScript() method or add a literal control and set the text property to the javascript function. When the literal control is rendered, the javascript is executed.
SharePoint 2007 Creating Custom Forms for Custom Lists
I was recently wondering how I was going to create custom forms (EditForm.aspx, DispForm.aspx) for a custom list.
Now I want to deploy my custom list as a feature of course so I need to add these forms and the associated schema.xml file into my Visual Studio project.
But how was I to go about creating the form?
I though about using SharePoint Designer but a cold shiver ran down my spine.
Than a friend of mine pointed out this wonderful utility: OCDExportList
It is an extension to the stsadm command and is available as a WSP. It's deployed globally to your SharePoint site.
After that you can use the command
stsadm -o ocdexportlist -url http://mysiteurl -name listname -dir c:\temp
Now I want to deploy my custom list as a feature of course so I need to add these forms and the associated schema.xml file into my Visual Studio project.
But how was I to go about creating the form?
I though about using SharePoint Designer but a cold shiver ran down my spine.
Than a friend of mine pointed out this wonderful utility: OCDExportList
It is an extension to the stsadm command and is available as a WSP. It's deployed globally to your SharePoint site.
After that you can use the command
stsadm -o ocdexportlist -url http://mysiteurl -name listname -dir c:\temp
and it will generate in the c:\temp directory the schemal.xml file and assoicated forms for this list. Copy this across to the feature folder of the custom list and you should be good to start customizing.
That's a great time saver.
Subscribe to:
Posts (Atom)