I was trying to do this the other day: display the filter icon on a gridview. Now when you do a sort an icon is displayed in the heading of the gridview as to whether it's an ascending or descending sort but there is no such default behaviour when filtering. Its a problem because you can't tell if a filter is applied or not unless an icon is displayed.
So here is the solution which you need to plug into the RowDataBound event. It involves checking the value of the FilterFieldname and if its not blank add an image control to the cell on which the filter is placed.
There is no need to have the alternate code to remove the filter as it seems to do this anyway. The image I was using for the filter comes from the images directory in MOSS 2007. I've displayed the image to the left of the header text which has a slightly better behaviour than putting it on the right. Below this text I show how to replace the priority icon with a symbol, again quite a common requirement.
void gridView_RowDataBound(object sender, GridViewRowEventArgs e)
{
// show the filter icon
if (gridView.FilterFieldName != "")
{
int head = 0;
if (e.Row.RowType == DataControlRowType.Header)
{
for (int i = 0; i < colsNames.Length; i++)
{
if (colsNames[i].ToString().ToLower() == gridView.FilterFieldName.ToLower())
{
head = i ;
break;
}
}
Image img = new Image();
img.ImageUrl = "_layouts/images/ewr093.gif";
img.ImageAlign = ImageAlign.Left;
e.Row.Cells[head].Controls.Add(img);
}
}
// show the priority icon
// replace square brackets for img elemet with angle brackets
if ((e.Row.RowType == DataControlRowType.DataRow))
{
int index = 0;
for (int i = 0; i < colsNames.Length; i++)
{
if (colsNames[i].ToString().ToLower() == "priority")
{
index = i;
break;
}
}
string priority = e.Row.Cells[index].Text;
switch (priority)
{
case "High":
e.Row.Cells[index].Text = "[img src='../_layouts/images/urgent.gif']";
break;
case "Low":
e.Row.Cells[index].Text = "[img src='../_layouts/images/arrdowni.gif']";
break;
default:
e.Row.Cells[index].Text = "";
break;
}
}
}
Friday, May 16, 2008
Saturday, May 10, 2008
Custom Installer and MSIs
When deploying software into a Test or Production environment, it’s worth spending the time developing an automated deployment. In the long run it will save time and will hopefully avoid mistakes if a file or a configuration setting is forgotten.
For me, automated deployment means developing an MSI. You could try zipping files that need to be deployed and writing batch files to install them but you really can’t beat MSIs. An MSI has two outstanding features: they are easy to install and include the ability to uninstall. We are fallible creatures and make mistakes so the ability to uninstall and try again is a necessity.
Easy installation is important for a Production environment where access may be restricted and you need to provide installation instructions for someone else. Frankly, if I was responsible for a Production environment, I wouldn’t let someone like me anywhere near it! Processes and change management are crucial in a Production environment and this is a different mind set to when you’re developing.
Anyway, back to MSIs. The point about an MSI is that it will perform checking for disk space and check if the correct software is installed (like .NET Framework 2.0) and will install your files to a target location. It can add files to the GAC too and then when you uninstall it will delete all trace of the files. Terrific, but I want to do more. I’ve got a web site and it's got a WEB.CONFIG file that has a number of ‘appsetings’. I need to amend these ‘appsettings’ to be suitable for the target environment. I also need to create a web site and configure the IIS attributes on it (e.g. Integrated Windows authentication and anonymous access disabled). You can get the MSI to do all of this for you by using a Custom Installer. When you run the MSI wizard you can prompt for the values you want to set in the WEB.CONFIG and then the Custom Installer can complete all the other steps for you. And yes, it can also reverse these steps when you uninstall.
Start by creating the Custom Installer first. Create a New Project that is a Class Library. Set the namespace and rename the Class to say CustomWebSiteInstaller. Add the following references :
System.Configuration
System.Configuration.Install
System.DirectoryServices
Add the using declarations at the top of the class and add the following attribute just above the class declaration:
[System.ComponentModel.RunInstallerAttribute(true)]
Make the class inherit the Installer class by adding after the class name:
: System.Configuration.Install.Installer
Then you need to override four methods:
public override void Install(System.Collections.IDictionary stateSaver)
{ base.Install(stateSaver);
}
public override void Uninstall(System.Collections.IDictionary savedState)
{
base.Uninstall(savedState);
}
public override void Rollback(System.Collections.IDictionary savedState)
{
base.Rollback(savedState);
}
public override void Commit(System.Collections.IDictionary savedState)
{
base.Commit(savedState);
}
The main method you are going to add code into is the Install but don’t neglect Uninstall and Rollback because if you want to reverse any actions that you add to the Install method you will need to enter them here. The Rollback method is executed if you hit the Cancel button when running the MSI wizard. The stateSaver is a collection of name/value pairs allowing you to save and restore settings (its how the MSI knows where you’re files are when you want to uninstall because it’s saved the target directory).
You should be able to compile your Custom Installer now. We’ll come back to add the code in a while because next you need to add a new Setup Project to the solution (you will find it under Other Project Types and ‘Setup and Deployment’. The Setup Project will create the MSI for you so give it a name like WebSiteInstaller. In Solution Explorer right click on ‘WebSiteInstaller’ and select Custom Actions, User Interface and then File System.
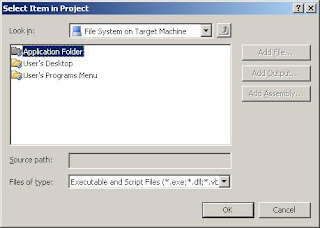
The File System shows 3 default folders:
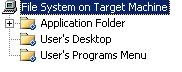
The Application Folder is by default
[ProgramFilesFolder][Manufacturer]\[ProductName]
Where Manufacturer and Product name are properties of the Setup Project. It means that the files you add to the Application Folder will be copied into \Program Files\MyCompany\MyProduct but of course you can change this during the installation.
You might want to add subfolders to the Application Folder, for example a bin directory.
In the right pane, use right click to add files and assemblies and project output.
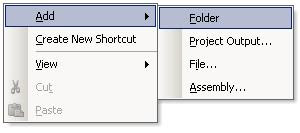
First let’s add the Custom Installer. Select Project Output. In the dialog, select the CustomWebSiteInstaller project and then Primary output and click OK.
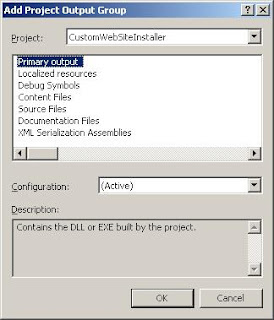
This will add the DLL into the Application Folder directory as part of the installation and this is mandatory so that you can run your custom actions.

To the Solution you will need to add the Project you need to deploy and then you use this same dialog to add files, assemblies or Project Output. It is aware of dependencies so will add your dependent DLLs automatically. So add the other files that will make up your application.
Select the User Interface tab. Note that the user interface displays a list of the default screens which are displayed when you run the MSI wizard. Right click on Start and select Add Dialog. You’ve now got a list of custom screens that you can add into the wizard. The ones we are interested in are labelled ‘Textboxes (A) , (B) and (C).
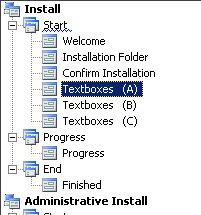
If you add Textboxes (A) you will see under properties you have four textboxes referred to as Edit1 through to Edit4 where each has four properties
EditXLabel
EditXProperty
EditXValue
EditXVisible
The Label is the prompt you will see to the left of the text box. The Property is how you can reference the textbox in code (it’s always uppercase and without spaces). Value is a default value that will be shown. Visible is obvious and you select it as true if you don’t want to show one of the text boxes. All three dialogs are the same so you can prompt for a maximum of 12 parameters during installation.
If you want more or you have more sophisticated requirements then just simple text boxes then you can create your own form in the Custom Installer and refer to the controls on that. Its more effort because all the controls are dynamically created and you have to set size and position etc. So I try and use these 3 built-in dialogs whenever possible.
So for one of the textboxes set the Label as ‘K2 Server: ’ then set the Property as ‘K2SERVER’.
Now go to the Custom Actions screen where you will see you have four items each corresponding to the Actions of the Installer: Install, Commit, Rollback, Uninstall. On the Install item, right click and select Custom Action.
In the Dialog box double click on the Application Folder.
There you will see the Primary output of the Custom Installer. Select it so that it adds it under the Install item in the left pane.
When you select this item on the left, the Properties window will show the all important ‘CustomActionData’. In here you will need to add the parameters you want to pass to the Custom Installer. So far we just have one: the K2SERVER so you want to enter:
/k2server="[K2SERVER]"
The syntax is important; get it wrong and you won’t be able to access the parameter. The quotes too are important, without them it won’t allow spaces in your parameters.
UPDATE: I've been getting an error when running the MSI "System.IO.FileNotFound" and it references a file in C:\Windows\System32\Files\...
I finally found the cause. It's because one of the values of the parameters entered ends with a backslash. It doesn't occur if the backslash is anywhere else in the text, only at the end does it cause a problem. Presumably "\" is acting like an escape character. I've not found a way round this yet - just avoid the need to have a final backslash. END OF UPDATE
Add other parameters in the same way using a space to separate. If you are wondering what the /k2server= is for its because these are also used as command line switches for the MSI so you have to be able to identify the parameter by name.
The MSI is just about done. Go back to the Custom Installer. To refer to the parameters in the Custom Installer you can use the Context class and within that there is a Parameters collection. The syntax is:
string myk2server = Context.Parameters[“K2SERVER”].ToString() ;
I use a function to access the Parameters collection because you need to trap for null values.
There are some built-in parameters in this collection and the most important of these is ‘assemblypath’ . This gives the full path to your custom installer including its name so it you strip off this last part what you have is the target directory. From there you can access the files you want.
The last part is then dealing with the actions that you want to perform during the install. I have a bunch of utilities in a DLL that will do the business from modifying the WEB.CONFIG, adding Identity Impersonate=true, adding registry entries, and running an executable.
I’ve added the code for the ExecuteProcess below. The example below will create a web site by using a batch file and pass a parameter to it. It takes a bit of effort to get the syntax right – try writing the message out to the event log and checking it before you try executing it.
utils.ExecuteProcess(TARGETDIR + @"\CreateIISWebSite.cmd", @" WebSite " + "\"" + strRootWeb + "\"");
Now you can run most executables with this method but note that the process you call needs to return that all important ExitCode. If it doesn’t then your MSI will sit there 95% complete but never actually finish. The main culprit of no ExitCode is MSBUILD.EXE. The solution is to write a batch file, passing the parameters you need and just to be certain add the Exit command as the last line. Works a treat. It’s a long time since I wrote batch files so I have to brush up on them.
And that brings me to my last point, I litter the event log with Information Messages from the Installer. I write out every member of the Parameters collection. Believe me it’s worth it. If the person doing the install claims there is a problem either during the install or post-install then you are going to want to know what values were entered. Get them to send you the Event Log and that will help you to figure out what they did wrong. You will also find that the Event Log includes the output from the batch file so you should ALWAYS check the event log to ensure it all worked. Your batch file might not actually do what it’s supposed to and if you don’t raise an error the MSI is going to report a successful install when in fact it wasn’t.
Good luck with your install!
// you need to add using System.Diagnostics;
public void ExecuteProcess(string fileNameString, string argumentsString)
{
Process process1 = new Process();
process1.StartInfo.FileName = fileNameString;
process1.StartInfo.Arguments = argumentsString;
process1.StartInfo.UseShellExecute = false;
process1.StartInfo.CreateNoWindow = true;
process1.StartInfo.RedirectStandardOutput = true;
process1.StartInfo.RedirectStandardError = true;
process1.StartInfo.RedirectStandardInput = true;
process1.Start();
process1.WaitForExit();
if (process1.ExitCode != 0)
{
// Log(string.Concat(new object[] { fileNameString, " failed - ExitCode=", process1.ExitCode, " Output: \n", process1.StandardOutput.ReadToEnd() }));
}
else
{
// Log(fileNameString + " succeeded - Output: \n" + process1.StandardOutput.ReadToEnd());
}
}
For me, automated deployment means developing an MSI. You could try zipping files that need to be deployed and writing batch files to install them but you really can’t beat MSIs. An MSI has two outstanding features: they are easy to install and include the ability to uninstall. We are fallible creatures and make mistakes so the ability to uninstall and try again is a necessity.
Easy installation is important for a Production environment where access may be restricted and you need to provide installation instructions for someone else. Frankly, if I was responsible for a Production environment, I wouldn’t let someone like me anywhere near it! Processes and change management are crucial in a Production environment and this is a different mind set to when you’re developing.
Anyway, back to MSIs. The point about an MSI is that it will perform checking for disk space and check if the correct software is installed (like .NET Framework 2.0) and will install your files to a target location. It can add files to the GAC too and then when you uninstall it will delete all trace of the files. Terrific, but I want to do more. I’ve got a web site and it's got a WEB.CONFIG file that has a number of ‘appsetings’. I need to amend these ‘appsettings’ to be suitable for the target environment. I also need to create a web site and configure the IIS attributes on it (e.g. Integrated Windows authentication and anonymous access disabled). You can get the MSI to do all of this for you by using a Custom Installer. When you run the MSI wizard you can prompt for the values you want to set in the WEB.CONFIG and then the Custom Installer can complete all the other steps for you. And yes, it can also reverse these steps when you uninstall.
Start by creating the Custom Installer first. Create a New Project that is a Class Library. Set the namespace and rename the Class to say CustomWebSiteInstaller. Add the following references :
System.Configuration
System.Configuration.Install
System.DirectoryServices
Add the using declarations at the top of the class and add the following attribute just above the class declaration:
[System.ComponentModel.RunInstallerAttribute(true)]
Make the class inherit the Installer class by adding after the class name:
: System.Configuration.Install.Installer
Then you need to override four methods:
public override void Install(System.Collections.IDictionary stateSaver)
{ base.Install(stateSaver);
}
public override void Uninstall(System.Collections.IDictionary savedState)
{
base.Uninstall(savedState);
}
public override void Rollback(System.Collections.IDictionary savedState)
{
base.Rollback(savedState);
}
public override void Commit(System.Collections.IDictionary savedState)
{
base.Commit(savedState);
}
The main method you are going to add code into is the Install but don’t neglect Uninstall and Rollback because if you want to reverse any actions that you add to the Install method you will need to enter them here. The Rollback method is executed if you hit the Cancel button when running the MSI wizard. The stateSaver is a collection of name/value pairs allowing you to save and restore settings (its how the MSI knows where you’re files are when you want to uninstall because it’s saved the target directory).
You should be able to compile your Custom Installer now. We’ll come back to add the code in a while because next you need to add a new Setup Project to the solution (you will find it under Other Project Types and ‘Setup and Deployment’. The Setup Project will create the MSI for you so give it a name like WebSiteInstaller. In Solution Explorer right click on ‘WebSiteInstaller’ and select Custom Actions, User Interface and then File System.
The File System shows 3 default folders:

The Application Folder is by default
[ProgramFilesFolder][Manufacturer]\[ProductName]
Where Manufacturer and Product name are properties of the Setup Project. It means that the files you add to the Application Folder will be copied into \Program Files\MyCompany\MyProduct but of course you can change this during the installation.
You might want to add subfolders to the Application Folder, for example a bin directory.
In the right pane, use right click to add files and assemblies and project output.

First let’s add the Custom Installer. Select Project Output. In the dialog, select the CustomWebSiteInstaller project and then Primary output and click OK.

This will add the DLL into the Application Folder directory as part of the installation and this is mandatory so that you can run your custom actions.

To the Solution you will need to add the Project you need to deploy and then you use this same dialog to add files, assemblies or Project Output. It is aware of dependencies so will add your dependent DLLs automatically. So add the other files that will make up your application.
Select the User Interface tab. Note that the user interface displays a list of the default screens which are displayed when you run the MSI wizard. Right click on Start and select Add Dialog. You’ve now got a list of custom screens that you can add into the wizard. The ones we are interested in are labelled ‘Textboxes (A) , (B) and (C).

If you add Textboxes (A) you will see under properties you have four textboxes referred to as Edit1 through to Edit4 where each has four properties
EditXLabel
EditXProperty
EditXValue
EditXVisible
The Label is the prompt you will see to the left of the text box. The Property is how you can reference the textbox in code (it’s always uppercase and without spaces). Value is a default value that will be shown. Visible is obvious and you select it as true if you don’t want to show one of the text boxes. All three dialogs are the same so you can prompt for a maximum of 12 parameters during installation.
If you want more or you have more sophisticated requirements then just simple text boxes then you can create your own form in the Custom Installer and refer to the controls on that. Its more effort because all the controls are dynamically created and you have to set size and position etc. So I try and use these 3 built-in dialogs whenever possible.
So for one of the textboxes set the Label as ‘K2 Server: ’ then set the Property as ‘K2SERVER’.
Now go to the Custom Actions screen where you will see you have four items each corresponding to the Actions of the Installer: Install, Commit, Rollback, Uninstall. On the Install item, right click and select Custom Action.
In the Dialog box double click on the Application Folder.

There you will see the Primary output of the Custom Installer. Select it so that it adds it under the Install item in the left pane.
When you select this item on the left, the Properties window will show the all important ‘CustomActionData’. In here you will need to add the parameters you want to pass to the Custom Installer. So far we just have one: the K2SERVER so you want to enter:
/k2server="[K2SERVER]"
The syntax is important; get it wrong and you won’t be able to access the parameter. The quotes too are important, without them it won’t allow spaces in your parameters.
UPDATE: I've been getting an error when running the MSI "System.IO.FileNotFound" and it references a file in C:\Windows\System32\Files\...
I finally found the cause. It's because one of the values of the parameters entered ends with a backslash. It doesn't occur if the backslash is anywhere else in the text, only at the end does it cause a problem. Presumably "\" is acting like an escape character. I've not found a way round this yet - just avoid the need to have a final backslash. END OF UPDATE
Add other parameters in the same way using a space to separate. If you are wondering what the /k2server= is for its because these are also used as command line switches for the MSI so you have to be able to identify the parameter by name.
The MSI is just about done. Go back to the Custom Installer. To refer to the parameters in the Custom Installer you can use the Context class and within that there is a Parameters collection. The syntax is:
string myk2server = Context.Parameters[“K2SERVER”].ToString() ;
I use a function to access the Parameters collection because you need to trap for null values.
There are some built-in parameters in this collection and the most important of these is ‘assemblypath’ . This gives the full path to your custom installer including its name so it you strip off this last part what you have is the target directory. From there you can access the files you want.
The last part is then dealing with the actions that you want to perform during the install. I have a bunch of utilities in a DLL that will do the business from modifying the WEB.CONFIG, adding Identity Impersonate=true, adding registry entries, and running an executable.
I’ve added the code for the ExecuteProcess below. The example below will create a web site by using a batch file and pass a parameter to it. It takes a bit of effort to get the syntax right – try writing the message out to the event log and checking it before you try executing it.
utils.ExecuteProcess(TARGETDIR + @"\CreateIISWebSite.cmd", @" WebSite " + "\"" + strRootWeb + "\"");
Now you can run most executables with this method but note that the process you call needs to return that all important ExitCode. If it doesn’t then your MSI will sit there 95% complete but never actually finish. The main culprit of no ExitCode is MSBUILD.EXE. The solution is to write a batch file, passing the parameters you need and just to be certain add the Exit command as the last line. Works a treat. It’s a long time since I wrote batch files so I have to brush up on them.
And that brings me to my last point, I litter the event log with Information Messages from the Installer. I write out every member of the Parameters collection. Believe me it’s worth it. If the person doing the install claims there is a problem either during the install or post-install then you are going to want to know what values were entered. Get them to send you the Event Log and that will help you to figure out what they did wrong. You will also find that the Event Log includes the output from the batch file so you should ALWAYS check the event log to ensure it all worked. Your batch file might not actually do what it’s supposed to and if you don’t raise an error the MSI is going to report a successful install when in fact it wasn’t.
Good luck with your install!
// you need to add using System.Diagnostics;
public void ExecuteProcess(string fileNameString, string argumentsString)
{
Process process1 = new Process();
process1.StartInfo.FileName = fileNameString;
process1.StartInfo.Arguments = argumentsString;
process1.StartInfo.UseShellExecute = false;
process1.StartInfo.CreateNoWindow = true;
process1.StartInfo.RedirectStandardOutput = true;
process1.StartInfo.RedirectStandardError = true;
process1.StartInfo.RedirectStandardInput = true;
process1.Start();
process1.WaitForExit();
if (process1.ExitCode != 0)
{
// Log(string.Concat(new object[] { fileNameString, " failed - ExitCode=", process1.ExitCode, " Output: \n", process1.StandardOutput.ReadToEnd() }));
}
else
{
// Log(fileNameString + " succeeded - Output: \n" + process1.StandardOutput.ReadToEnd());
}
}
Friday, May 9, 2008
Voyages with BlackPearl - 5. Environment Variables and Deployment
I have to admit that I just don’t understand Environments in K2 [blackpearl]. The first time I wanted to create an Environment variable of my own I did what I guess most people would do and added it to the Development environment. I didn’t think it through. My mistake became obvious when I wanted to deploy it to a Test environment on a customer site. The Test environment was just like Production and did not have Visual Studio installed, which is fine because that is what the MSBUILD files are for.
If you’re not familiar with these files they are created when you use ‘Deploy’ from Visual Studio. A new directory is created under ‘obj\Debug’ called Deployment and in there you will see the .msbuild file and your compiled workflow(s) and ExtenderProjects in the Bin directory. So if your Test server doesn’t have Visual Studio installed you just need to copy the contents of the Deployment directory over to the server and then use the MSBUILD.EXE to do the deployment. MSBUILD.EXE is a utility found in the directory C:\WINDOWS\Microsoft.NET\Framework\v2.0.50727 so you may want to add this path to the Environment Settings of the server.
The syntax for deployment is as follows:
MSBUILD.EXE [k2proj].msbuild /p:Environment=[environment]
For example
MSBUILD MyK2Proj.msbuild /p:Environment=Development
Now what the /p:Environment switch is doing is determining which settings to use within the .msbuild file. You need to open the .msbuild file to understand what is going on.
Under the root node ‘Project’ there is a collection of nodes which look like this:
[PropertyGroup condition="$(Environment) == 'Development'"]
Beneath that is the [EnvironmentFields] node which contains all of the [Fields] in the template.
When the .msbuild file was created it created an Environment node for all of the environments on the server (the two defaults are Development and Production) and then you use the /p:Environment switch to tell MSBUILD which node to use.
But when you execute the command it will fail and that is because MSBUILD uses one of the built-in connection strings (I think it’s the ‘Workflow Server’ one) to make a connection to the K2 server. It fails because the Test environment has a different K2 Server name and if you are not using Integrated authentication it has a different Administrator account, a different domain and/or a different password.
The only solution is to fix the connection strings in the Environment fields to match what they should be in this Test environment. If you are doing it manually then you can copy the values from the K2 Workspace. I wanted to automate the process so I wrote some utilities that will parse the XML and replace each of the attributes (K2 Server, Domain etc) with the correct values (see below).
I call these utilities within an MSI file but I’ll describe that in more detail in the next post.
It was about this time I realised my mistake. I tend to use the same development image for several projects and I realised the .msbuild file contained all the Environment variables that I had added, not just the ones for this project. This will get in a right mess because you won’t be able to tell which environment variables apply to which workflow. What about if you have two workflow processes that each require different ‘FromEmailAddress’ values?
The approach I now adopt is to totally ignore the default Environment libraries and create a brand new library of the same name as my K2PROJ file. That way I don’t get confused with the environment variables. I toyed with the idea of creating development, test and production versions but in the end decided I would have just one environment library per project and amend it for each target server.
The other thing to note about the MSBUILD deployment is what happens when you do successfully deploy the workflows using your custom Environment library. You go to the K2 workspace, open the K2 Server and open the Environment Library section. You drill down to Templates, Default Template and Environments and, GULP!, your newly created Environment library is not there. No worries because you don’t need a template library. The template is just a step towards creating the String Table and it’s the String Table that the workflow uses. I get so used to looking at Environments that I realised I was looking in the wrong place. The String Table is nestled away under the Process.
The two utilties are below (note the first is an extract, just repeat the section that I’ve marked).
In order to call them I load the .msbuild file into an XmlDocument using the Load method then pass the XmlDocument to the functions. I then use the Save method to save it back to its original location.
I’m still not sure that I understand Environments but I have something that works for me.
// replaces values in connection string
public XmlDocument ModifyMSBuild(XmlDocument xmldom, string Environment, string OldDomain, string NewDomain, string OldK2Server, string NewK2Server,string OldAdminAccount, string NewAdminAccount, string OldPassword, string NewPassword)
{
try
{
XmlNodeList nodeList = null;
XmlNode node = null;
node = xmldom.SelectSingleNode("//Root[@Name='" + Environment + "']");
// Replace the Domain Name
nodeList = node.SelectNodes("./Field[contains(@Value,'" + OldDomain + "')]");
string strAttribValue = "";
foreach (XmlNode domNode in nodeList)
{
string x = domNode.OuterXml;
if (domNode.Attributes.Count > 0)
{
strAttribValue = domNode.Attributes["Value"].Value.ToString();
{
strAttribValue = strAttribValue.Replace(OldDomain, NewDomain);
domNode.Attributes["Value"].Value = strAttribValue;
}
}
}
// repeat for the Host Server, Admin Account and Password like this:
// nodeList = node.SelectNodes("./Field[contains(@Value,'" + OldK2Server + "')]");
// foreach loop again
return xmldom;
}
catch (Exception ex)
{
// log.WriteToLog(ex.Message, "CustomError");
return xmldom;
}
}
// updates values in a specific environment variable
public XmlDocument ModifyEnvironmentField(XmlDocument xmldom, string Environment, string EnvironmentField, string newValue)
{
try
{
XmlNode nodeField = null;
XmlNode node = null;
node = xmldom.SelectSingleNode("//Root[@Name='" + Environment + "']");
nodeField = node.SelectSingleNode("./Field[@Name= '" + EnvironmentField + "']");
if (nodeField != null)
{
nodeField.Attributes["Value"].Value = newValue;
}
return xmldom;
}
catch (Exception ex)
{
// log.WriteToLog(ex.Message, "CustomError");
return xmldom;
}
}
Subscribe to:
Posts (Atom)