This might be a bit basic but I thought I would give a step by step guide on how to customise a SharePoint list form. The first step is you need a web control.
In your Visual Studio project you need a TEMPLATES folder and a CONTROLTEMPLATES folder beneath it. This is where you add your user control. Lets not worry too much about the code on the user control just yet.
Next we want to make the web control available when the SharePoint list form loads.
To do this add the line
<%@ Register TagPrefic="xyz" TagName="MyWebControl" src="~/_controltemplates/WebControl.ascx" %>
into the web page.
Now there are two ways to do this depending on what you want to achieve.
Firstly you can add the line into the master page so that is available to every page on the site.
Secondly you can add it to the custom page associated to the list.
In either event, the result is that the code on the web control is executed when your page loads. Since your web control is injected into the HTML of the page you can do all kindes of things from adding inline css styles that can be applied to the page or by injecting javascript onto the page to hide a menu or menu item.
One approach is to add an asp:panel onto the ASCX and embed your css styles between the start and end tags of the panel. You can also embed javascript to change the way the page is displayed.
Your code behind can then determine when to make the panel visible or hidden which will determine if the styles are applied to the page or not.
If you need to have more control over the javascript go to the code behind and use the RegisterClientScript() method or add a literal control and set the text property to the javascript function. When the literal control is rendered, the javascript is executed.
Friday, January 21, 2011
SharePoint 2007 Creating Custom Forms for Custom Lists
I was recently wondering how I was going to create custom forms (EditForm.aspx, DispForm.aspx) for a custom list.
Now I want to deploy my custom list as a feature of course so I need to add these forms and the associated schema.xml file into my Visual Studio project.
But how was I to go about creating the form?
I though about using SharePoint Designer but a cold shiver ran down my spine.
Than a friend of mine pointed out this wonderful utility: OCDExportList
It is an extension to the stsadm command and is available as a WSP. It's deployed globally to your SharePoint site.
After that you can use the command
stsadm -o ocdexportlist -url http://mysiteurl -name listname -dir c:\temp
and it will generate in the c:\temp directory the schemal.xml file and assoicated forms for this list. Copy this across to the feature folder of the custom list and you should be good to start customizing.
That's a great time saver.
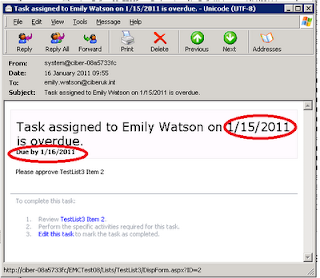
SharePoint 2007 Approval Workflow US Date format in Emails
I am using SharePoint 2007 with SP2 in a 64bit environment. The SharePoint Server regional settings are set to English (UK) and the SharePoint site I am using is also set English UK settings. I am also using the out-of-the-box approval workflow so you would expect that any dates are shown in UK format both in the workflow history and in emails sent by the workflow.
Wrong. They display in US format (MM/dd/yyyy).
Now when I Googled this I found this site which suggested it is fixed in the October 2008 Cumulative update. Indeed the Microsoft support page explicitly states as fixed "Sharepoint workflow notification e-mail messages do not use locale date and time formats".
Wrong again.
Maybe it was fixed back in October 2008 (pre SP2) but I can tell you it's not working post SP2. I raised a support call with Microsoft and proved that the dates are indeed in US format when they shouldn't be.
You require the August 2010 Cumulative Update from Microsoft to be applied to get this to work. Once the hotfix is applied then it all works prefectly with the due date correctly appearing in UK format both in the workflow history and in the emails. This even works on workflows that are in flight before you applied the hotfix.
While I am glad to have a solution, Microsoft should be ashamed that something as basic as this has had to be fixed twice. Zero points, Microsoft!
Saturday, January 15, 2011
BizTalk Server Evaluation Version Upgrade to Full Version
One of my customers had installed an evaulation version of BizTalk Server 2009 for their test environment, and sure enough the version expired and BizTalk stopped working.
So they needed me to upgrade it to the full version (in this case we used the Developer Edition but the same process is used for upgrading to Standard or Enterprise Editions).
But when I started the Install process it immediatley gave the message that you can't upgrade the evaluation version and you must uninstall and reinstall.
At first sight this looks disastrous but infact you can recover everything because unsinstall does not delete the Biztalk databases. But there are a number of steps you should take before uninstalling BizTalk.
1. Export the applications to MSI files and Export the Bindings just in case it all goes horribly wrong.
2. Make a screen shot of the host instances in BizTalk Administration because these will be deleted and you will need to recreate them.
3. The host instances use service accounts and you'll need the passwords for these accounts.
4. Ensure that the account you are going to use to install BizTalk is the same one you used for the Evaluation version. If like me you don't know, use an account who is a local administrator and is sysadmin on the SQL Server box where the databases are installed (dbowner of all the BizTalk databases may be enough).
5. Make sure you have a copy of the BTSNTSVC.exe.config file as this may contain configuration settings.
6. Have a backup of the Enterprise Single Sign-On secret - and you must know what the password is (ideally the password hint will help). This is vital. If you don't have the password for the backup you will be hosed. I don't know if you are able to do the backup once the evalaution has expired. If you can open a command window and navigate to c:\Program Files\Common Files\Enterprise Single Sign-On. Then use
ssoconfig –backupSecret backupfilename
The Enterprise SSO option is currently configured so select Join an existing SSO system. You will get a warning symbol indicating you may need to restore the SSO master secret (you will definitely need to).
On the Group otion select Join an existing BizTalk Group. On the BizTalk Server RunTime do not Create In-Process Host and Instance because In-Process Host is still present. Liekwise do not create Isolated Host and Instance.
Configure the other options appropriately and Apply the Configuration.
If all goes well the Configuration will complete successfully. But you are not done.
7. First open a command window and navigate to c:\Program Files\Common Files\Enterprise Single Sign-On. Then use
ssoconfig –restoreSecret backupfilename
It will prompt you for the password showing you the password hint. This is why point 6 was so important if you don't have a backup or you don't know the password you are stuffed.
8.Open BizTalk Administration go to the Host Instances and add the ones that were originally there (which is why we did point 2 above). Use the same accounts and passwords and start them up.
9. Edit the BTSNTSvc.exe.config file and add any custom entries that you saved from point 5. Stop and restart the BizTalk Service(s).
That should be it, you should be up and running again. Its a pity Microsoft don't offer a better upgrade path than this. If the full version is available on MSDN my advice is avoid using the evaluation copy.
Subscribe to:
Posts (Atom)